What You Should Do Right Now (Step-by-Step)
Step 1: Stop using the ice
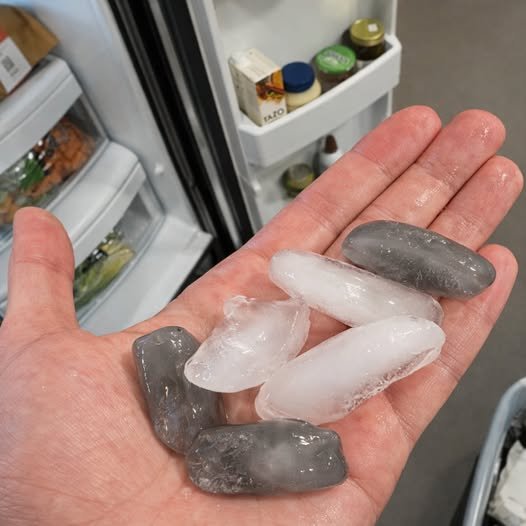
- Throw away all ice in the bin (gray and normal). Mixing can spread whatever is causing the color.
Step 2: Clean the ice bin thoroughly
- Wash the bin with warm water and dish soap.
- Rinse well and let it fully dry before reinstalling.
Step 3: Replace the refrigerator water filter
- Use the exact filter model recommended by your fridge manufacturer (off-brand filters can fit but sometimes shed more carbon or seal poorly).
- After replacing, flush the system: dispense and discard several minutes’ worth of water (or follow your manual’s gallon recommendation).
- Dump the first 2–3 full batches of ice after the new filter goes in. This helps clear trapped particles and air.
Step 4: Inspect your water supply line
- Check the line behind the fridge for kinks, corrosion, or an older/deteriorating hose.
- If the line looks questionable, replacing it (or having a plumber check it) is a smart move.
Step 5: Watch for patterns
- If the ice turns gray again after a new filter + cleaning, that points to either the water supply (sediment/minerals) or a mechanical/part issue inside the ice maker.
When to Call for Service or Test Your Water
Get help if any of the following are true:
- Gray ice continues after filter replacement and flushing
- You see gray/black specks repeatedly
- The water from your fridge dispenser looks off, smells weird, or tastes unusual
- Other faucets in your home also show discoloration (possible water supply issue)
In that situation, consider a basic water test (especially for sediment/metals like manganese) and contact the refrigerator manufacturer or an appliance technician to inspect the ice maker assembly.
Bottom Line
If your ice is turning gray, the safest move is simple: don’t use it, dump it, replace the filter, clean the bin, flush the system, and see if it returns. If it does, escalate to a water test or a service call—because clean ice should never look gray.
